
We’ll use Setuptools
In another article, I outlined how to handle Python imports and dependencies in Poetry. Poetry has a lot to recommend it:
- writes a
pyproject.tomlfile for you - creates an environment for you
- pins top-level dependencies in
pyproject.toml(nice if that’s what you want) - automates a lot of adding and removing dependencies
- all of the documentation is in one place
But there are a few minor cons:
- adds minor complexity to ci
- adds minor complexity to tox
- some tools have a hard time finding your environment
- no PEP 621 compliance
- anthonywritescode doesn’t use it, and he knows more than most of the rest of us combined.
So, here is an alternative (with its own minor pros and cons). I intend this as a simple reference you can paste commands out of. It will get you through the usual workflow of creating a Python library and hosting it on PyPI.
1. Create exactly this project structure
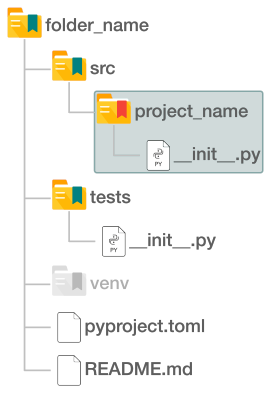
Put your Python modules in the red folder. Don’t create the venv folder. We’ll do that in a later step. It’s here in in the image just to show you where it will go.
2. Install these tools in your global environment
pip install pip-tools build twine
3. Create and activate a virtual environment in your project root
python -m venv venv

echo " if you are using Windows"
.\venv\Scripts\activate

echo " if you are using Linux"
source venv/bin/activate
A tool might ask for your project interpreter. If you are using Windows, this will be .\venv\Scripts\python.exe. If you are using Linux, this will be venv/bin/python.
4. Use this template to create a simple pyproject.toml
[project]
name = "no_spaces_in_your_project_name"
version = "0.1.0"
description = "describe your project here"
authors = [{ name = "Shay Hill", email = "shay_public@hotmail.com" }]
license = {text = "MIT"}
readme = "README.md"
requires-python = ">=3.9"
dependencies = ["numpy", "requests"]

[project.optional-dependencies]
dev = ["pytest", "pre-commit", "commitizen"]

[build-system]
requires = ["setuptools", "setuptools-scm"]
build-backend = "setuptools.build_meta"
5. Create requirements.txt files
pip-compile -o requirements.txt pyproject.toml --upgrade --strip-extras
pip-compile --extra=dev -o dev-requirements.txt pyproject.toml --upgrade --strip-extras
6. Install your dependencies into your virtual environment
echo " if you are using Windows"
pip-sync --python-executable .\venv\Scripts\python.exe requirements.txt dev-requirements.txt

echo " if you are using Linux"
pip-sync --python-executable venv/bin/python requirements.txt dev-requirements.txt
For right now, you will only need the dev-requirements.txt file. It has all your dependencies, including your dev dependencies, but I wanted to show you how to pip-sync multiple files.
7. Install your project
python -m pip install -e .
Don’t miss that trailing period. If you update your requirements in pyproject.toml, remember to repeat steps 5, 6, and 7.
8. When you are ready to publish your project on PyPI
python -m build
twine upload --repository testpypi dist/*

echo " or"
twine upload dist/*
Comments and Questions
-
Comment: You may want to start by reserving your project name on PyPI and testPyPI.
-
Do I commit my venv folder? No. It is common practice to put
venvin your global.gitignorefile. -
What should I do with my requirements.txt and dev-requirements.txt files? Unless you know you need pinned dependencies, assume you don’t need your requirements files. Don’t commit them. The same goes for the
distandsrc\*.egg-infofolders the above instructions will generate. -
What if I really need to pin a top-level requirement? If you need to pin a top-level requirement in
pyproject.toml(like Poetry does), see PEP 508. There is a lot of information there you won’t need, but the short version is thatdependencies = ["numpy>=1,<1.25", "requests<=2.26.0", "pydantic==1.8"]and similar work. -
What if I want to publish a script? Find some more use cases here. This video walks through a lot of the same steps, nice and slowly.


